
How to Draw Sea Animals Easily
How to Draw Sea Animals. The ocean is full of amazing creatures, big and small. From the smallest organisms to giant whales, there is so much critter to see, and we don’t even know what other mysteries the deeper waters might hold.
Also, check our Tiger Coloring Pages.
Anyone interested in sea life will have their favorites, which will be different for everyone. We’ve picked out some popular favorites in this sea creature drawing guide.
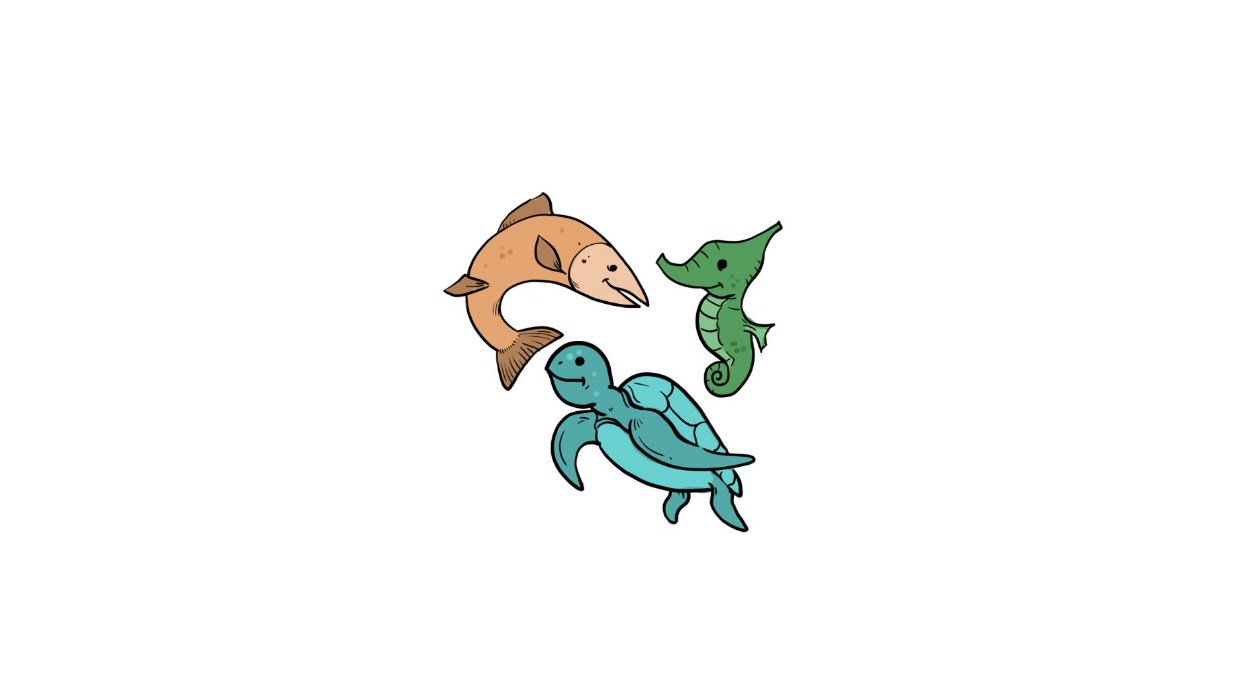
In these six steps, you’ll draw a trio of a fish, a seahorse, and a sea turtle. Once you’ve drawn these adorable cartoon versions of these animals, feel free to add some of your favorites!
In addition to walking you through the process of drawing these designs, we’ll also look at ways you can customize your design.
This can be achieved with additional details, colors, and other creative options. This guide has a lot to talk about, and we’re sure you’ll enjoy it!
So get ready to take a deep breath and dive into this guide as we journey under the ocean and draw these three adorable sea creatures and any other details you wish to to Draw Sea Animals.
How to Draw Sea Animals
Step 1
As mentioned in the introduction, we will draw three animals for this drawing. These include a seahorse, a sea turtle, and a fish.
We will also draw them in this order, starting with the seahorse. Seahorses are amazing little creatures with a unique look that sets them apart.
Before you draw this seahorse, you should look at your page and plan the drawing. Wouldn’t you like to draw a giant seahorse and leave no room for the other sea creatures?
You can plan this by making rough pencil sketches of the animals to plan how they will be placed on the page. You can also draw other details, such as background elements.
For example, if you want a treasure chest at the bottom of the sea, you can mine it about now.
Whether or not you go with these rough sketches is up to you, but let’s draw the seahorse for now.
First, we outline the seahorse, which has a specific shape. First, let’s draw the seahorse’s head, which will have a thin, pointed section at each end to Draw Sea Animals.
The left side is the seahorse’s snout and has a slight curve. The pointed part on the right becomes straighter and points diagonally upwards.
The rest of the head is then drawn with curved lines. Finally, you can draw the body with some wavy lines with a small fin sticking out to the right.
There is also a small curve at the body’s base where the curled tail is located. That’s all for now, so let’s move on to step 2 to Draw Sea Animals!
Step 2
Let’s leave the seahorse alone and add the sea turtle to this sea animal design instead.
Unlike the seahorse, we don’t draw the entire outline.
Instead, we’ll start with the turtle’s head. This will have a rounded line with a small lip pointing to the left.
You can then extend another downward curved line for the base of the head. As you can see in the reference image, the head is round, much like a real turtle would look.
The base of the neck on the right side curves to the right in a wavy line, eventually ending in the turtle’s fin. This fin has a long shape with a curved, pointed tip to Draw Sea Animals.
When drawing this part, refer to the reference image, as it can be difficult to see where the neck ends and the fin begins.
Of course, you can’t have a turtle without a shell on its back, so let’s add that now as well.
The shell is a simple curved line that runs across the top outline of the fin and should be easy to draw. It’s not very detailed, but we’ll add some details soon. If you are initially happy with the look, we can move to step 3 of the guide to Draw Sea Animals.
Step 3
We’ll get back to our turtle friend shortly, but this third step of our sea creature drawing guide will focus on the third member of the trio, the fish.
Again, we’re not going to draw the entire outline of this fish, we’re just going to start with the outline. As you can see in the reference image, this outline’s beginning is one long line.
This might trick you into thinking that it’s the easiest drawing yet, and while that may be true, it still has its challenges. You can start to the left and then extend the line to a right turn.
The curve of this top contour is very sharp and can be difficult to get right. The curve is so sharp because the fish swim in the middle of the water to Draw Sea Animals.
We draw its mouth on the far right of the fish, which is pretty easy. This mouth can be drawn with a horizontal V shape that extends inward as a slightly curved line.
Finally, you can draw the bottom half of the fish outline with another curved line that mirrors the trajectory of the top outline.
Once these lines are drawn, we have the beginning of the fish. There is a gap on the left and no details, but these will be announced soon as we proceed with the next steps to Draw Sea Animals.
Step 4
We have the beginning of each sea creature, and now you can complete the outline for each. This allows us to focus on the internal details in the next step.
We’ll focus on each animal individually, starting with the seahorse. This will be the easiest step in this step as we will only add two small lines.
One of these extends to the base of the head and is simply a small curved line. Finally, we add a curved line at the base of the tail to show the curl in the tail to Draw Sea Animals.
Next, we can focus on the turtle and start with a curved line for its belly. Next, we’ll add the other big fin in front.
We will also add a curved line on the face for her smiling mouth. You can lock the turtle with two small fins on the back of its body.
To wrap up this step, let’s focus on the fish. You can draw his tail with some curved lines that fan out outwards. Add a small, pointed fin near the fish’s back and then near its head.
We will also draw a triangular fin on its back. Finally, draw a vertical curved line for the fish’s face area.
That was a lot to do in one step, but the hardest parts are behind us! In the next step, we’ll finish with minor details before coloring your image in the last step to Draw Sea Animals.
Step 5
In this step, we will bring this sea animal drawing to life with some small but important details.
First, add a black dot to each animal to give each one an eye to Draw Sea Animals.
You can then add some curved lines on the seahorse’s belly and some smaller lines on its head.
Then some rounded lines can be added to the turtle’s shell for more texture, and smaller lines can also be used on the fins and other areas for more texture.
Finally, the fish can be completed with structural lines on the tip of the tail and small details on the fins. Once you’ve added those details, you’re technically done!
Before proceeding, make sure to add any other ideas you need to add to the scene. We mentioned the idea of adding a background earlier in the guide.
There are so many interesting details you could add if needed. We already gave the idea for a treasure chest, but you can also draw your favorite sea animals and plants in the scene.
This would be a great opportunity to show off which sea creatures you like the most! You could also add some mythical creatures like a mermaid to Draw Sea Animals.
The possibilities are as big as the sea, so let your imagination run wild and see what happens.
Step 6
You have now reached the final stage of this sea creature drawing guide, and it’s time to color these adorable animals.
We kept the colors for each animal simple enough, and each animal has its color scheme to Draw Sea Animals.
The seahorse is colored with some dark and light shades of green that contrast.
So for the turtle, we took a similar approach, contrasting light, and dark colors, only this time, we went with a blue color scheme.
Finally, we used two shades of brown for the fish to give it a more muted look. These colors are a suggestion; you can use any colors you like!
It would be best if you swapped out our chosen color combinations or used unique colors. They can be as light or dark as you like, and either approach will look gorgeous.
You can also think about the artistic tools and mediums you use to get your colors. For example, bright, vibrant colors, colored pens, and markers might be good choices. Watercolor paints and colored pencils are suitable for lighter colors.
Here you can take over and present what you think would be best, and it will be great to see what you decide to do to Draw Sea Animals!
Your Sea Animals Drawing is Finished!